Autopilot

Featured

What is it, and what does it do?

So let’s discuss this for a second. We see how Autopilot magically knows all devices there are and once they are turned on for the first time, it just know which device belong to which company. Not only that, but it just knows which user will be using this device and once user puts in correct password, not username, just password, it installs all the applications, configures keyboard, desktop background, start menu layout, installs Office and other applications, such as VPN client, PDF readers, etc., starts OneDrive sync. It also configures Antivirus, Firewall, disk encryption, … everything IT and security care about.

But what is true and what is “marketing”? As Microsoft documentation pages say about Autopilot:

“Windows Autopilot enables you to:

Automatically join devices to Azure Active Directory (Azure AD) or Active Directory (via Hybrid Azure AD Join). For more information about the differences between these two join options, see Introduction to device management in Azure Active Directory.

Auto-enroll devices into MDM services, such as Microsoft Intune (Requires an Azure AD Premium subscription for configuration).

Restrict the Administrator account creation.

Create and auto-assign devices to configuration groups based on a device’s profile.

Customize OOBE content specific to the organization.”

https://docs.microsoft.com/en-us/mem/autopilot/windows-autopilot

The truth about Autopilot. 🙂

If I simplify just a little bit here, and please do not hold this against me, Autopilot is nothing more than Unattend.XML. Yes, I know there are major differences between the two, but in the end, that’s what it does. I allows us to define which (A)AD device is to join, with what name, whether to display license terms and privacy settings screen, whether user should be administrator on device or not and what region/keyboard to set. This is pretty much a subset of Unattend.xml configurations.

So what does Microsoft mean with

Instead of re-imaging the device, your existing Windows 10 installation can be transformed into a “business-ready” state that can:

apply settings and policies

install apps

change the edition of Windows 10 being used (for example, from Windows 10 Pro to Windows 10 Enterprise) to support advanced features.

https://docs.microsoft.com/en-us/mem/autopilot/windows-autopilot

Yes. You can most definitely do all this, and we will do it, but this is, at least in my opinion, not part of Autopilot. This is all done MDM, in our case Intune. Why am I saying this? Because I can achieve the exact same result on any device that is brought under MDM using any other method. For example manual enrollment. The end result will be exactly the same.

There are several ways how we can set up Autopilot.

First we have User-driven or self-deploying. We will be using User-driven deployment. Self deploying is an interesting scenario for kiosk devices, and we’ll take a look it separately, but for our client, Kuhar LLC, User driven deployment is the one we will choose.

Secondly we can choose devices to be Azure AD joined or Hybrid joined. Here we will select Azure AD joined. We will be using Azure AD joined. In all my engagements with clients I have yet to encounter a blocking scenario for devices to ne Azure AD joined instead of Hybrid joined. There might be additional things to consider, for example having permissions on shares set to device instead of user object, but these can be easily changed and they do not outweigh the added complexity that Hybrid join brings.

With that out of the way, let’s take a look at Autopilot and set it up for our customer.

First we go to MEM admin center, https://endpoint.microsoft.com/. Please excuse my use of Intune portal in some places. 🙂

Select Devices, go to Windows and click Windows enrollment.

This opens Windows enrollment blade, where we can see several options that we will need to set during our journey.

First we will create a deployment profile, so let’s select Deployment Profiles and Create profile. Under create profile, select Windows PC.

This will create new profile for us, so let’s give it a name and click Next. For now we will leave Convert all targeted devices to Autopilot to No, but that will change once we deploy the profile to a group.

Now that the profile is created, we can select all the things we talked above.

First, it’s an User-driven Deployment mode.

Second, Azure AD joined.

We will hide all the EULA and privacy settings, we will make users administrators on their devices, have them select their keyboard and region.

We will however apply a naming standard for Autopilot devices. We will name them as AP-%SERIAL%. I personally do not see much use in this, but we like to have structured names, that is how we have always done it, so why not. 🙂

Now we proceed by clicking Next. I will not be defining any scopes, at least for now, so let’s click Next to get to Assignments site, where we would be selecting a group to which we will be deploying this profile, however it has not been created yet, so let’s skip this for now as well and we’ll get back to it later. Now review the information and if we are satisfied with our settings, we can Create the profile.

So now we have a Deployment Profile created, let us create a group to which it will be assigned.

Go to Groups and Create new group. It will be a Security group, with a name that makes most sense to you, for me it will be Win10 – Autopilot Corp Devices. I like to use prefixes such as Win10- whenever I do a series of groups, policies, profiles, apps etc. This makes it so much easier to later go back and find things. Give the groups a description and select Membership type of Dynamic Device. Now click on Add dynamic query and put in the following query.

(device.devicePhysicalIds -any (_ -eq “[OrderID]:Corp”))

This query gets all devices that are added as Autopilot devices, devicePhysicalIds, and have an OrderID of Corp. This will be a tag that I will use, you can use other tags.

To add this query above, click on edit on the Configure rules page.

Now just simply Save the query, Create the group and it is done. Go back to Deployment profiles and assign it to the group we just created.

Next, we need to add a device to Autopilot. Now how do we do that?

Adding a device to Autopilot means adding some information to Intune that uniquely defines your device in the world. That information is Hardware Hash. There are two general ways of doing this. One is to extract this information from the device itself and adding it to Intune. The other way is to ask your vendor/partner to add this information into Intune for you.

Now your vendor/partner does not have to add full hardware hash to Intune, they only have to add a serial number. You might think that that is not fair. Why do you have to put there full 4K, 4096, characters for each device and vendors/partners only need to put in serial number, that is about 10 characters long. Well that is because Microsoft trusts vendors will assign information to correct clients, and if they do not it is quite easy for them to have a word with them. On the other hand, if you know how a manufacturer assigns serial numbers to devices, it is quite easy for an evil person to grab all of the serial numbers and assign these devices to themselves. Thus, preventing anyone else to claim them to their tenant, or even worse, you could deploy autopilot profiles to devices, preventing people that bought a device from using them. In short, hardware hash it is.

Ideally you want to talk to your vendor and have them add any new device you buy to autopilot. But for initial testing we will be using virtual machines and those need to be added to autopilot manually. To do this, we will be using a nifty script brought to us by Michael Niehaus. https://www.powershellgallery.com/packages/Get-WindowsAutoPilotInfo/3.5

So we will start a VM with Windows installed, but not yet configured. When we get to OOBE screen, we’ll press Shift + F10, to open CMD. From CMD we’ll call PowerShell. There we first add  Get-WindowsAutopilotInfo script

Install-Script -Name Get-WindowsAutoPilotInfo

Then run it using -GroupTag, -Assign and -Online parameters. This will add GroupTag we defined as a variable for our dynamic group membership. Yes I know it’s called OrderID there, which is what it used to be in Intune/Autopilot as well way back, but it got changed, just not in Azure AD, so yeah… OrderID and Group tag is one and the same. For now.

-Assign will make script wait for autopilot assignment to complete before it finishes. It can take a long time, as we are using dynamic group.

-Online parameter will add the device to Autopilot using Intune Graph API.

So we are running the following command:

Get-WindowsAutoPilotInfo.ps1 -GroupTag Corp -Online -Assign

When the script finishes, our device will be visible in Autopilot, it will be a member of Win10 – Autopilot Corp Devices group and it will have a Deployment profile assigned. When running with -Online parameter you will have to log in with a user that has permissions in Intune to add Autopilot device. When running it for the first time, you will probably be asked to grant consent to application, if that has not been done before.

So, let’s see all this really happened. Go back to MEM admin center and navigate to Devices -> Windows -> Windows Enrollment and select Devices node. This will open Windows Autopilot devices blade, where you will be able to see your Autopilot devices.

As you can see, we can see here information about the device added to Autopilot. Firstly, Serial number, we can then see it is a virtual machine, what group tag it has and whether it has a profile assigned to it or not. If all went well, you should see similar result as above.

Now that this is done, we can take a look at what does this actually do when we start the virtual machine. Restart VM and let’s see what happens.

We skip all of the OOBE screen and get directly to a screen, welcoming us to our organization.

Yes I know, I need to change the name of my directory 🙂

So, put in your username and on the next screen put in your password. Once the process finishes, you will have a machine, that is named according to our standard and is  joined to your Azure AD.

So that is it. That is what AutoPilot does.

Next time, we will build on this success. Now we start playing with the real deal. Adding devices into Intune, installing applications, configurations, etc.

Until then, stay safe.

Blogpost series:

In The Beninging

Featured

There has been so much talk and so much said about Autopilot in the past years it has become not just a buzzword, but for some companies a salvation answer to all the Covid problems. At least in terms of deploying and managing devices in this changed world. But has it? Do people really understand what Autopilot is, what it does and how to best leverage it?

In the last year I had so many projects and customer engagements in this space, it almost hard to believe. I was talking and presenting about Autopilot for the last couple of years at different conferences, presenting it to clients, trying to show benefits of it, but mostly this was not high on priority list for IT departments. Now that has changed, seemingly forever. Cloud management, internet devices and home office seem to be here to stay. And with that in mind, I went over recent engagements in my head and I discovered that there is still some confusion about Autopilot and what it does. And I don’t think Microsoft docs page on Autopilot helps that.

“Windows Autopilot is a collection of technologies used to set up and pre-configure new devices, getting them ready for productive use. You can also use Windows Autopilot to reset, repurpose, and recover devices.”

https://docs.microsoft.com/en-us/mem/autopilot/windows-autopilot

And a few paragraphs later it says this a bit differently:

“Windows Autopilot enables you to:

Automatically join devices to Azure Active Directory (Azure AD) or Active Directory (via Hybrid Azure AD Join). For more information about the differences between these two join options, see Introduction to device management in Azure Active Directory.

Auto-enroll devices into MDM services, such as Microsoft Intune (Requires an Azure AD Premium subscription for configuration).

Restrict the Administrator account creation.

Create and auto-assign devices to configuration groups based on a device’s profile.

Customize OOBE content specific to the organization.”

https://docs.microsoft.com/en-us/mem/autopilot/windows-autopilot

So where has all the management gone? Where is all the getting them ready for productive use?

Let’s try and see what is going on here. This is intended to be a blog post series where I will guide a client of mine, Kuhar LLC. (my lab), from having on-premises management only to being in what I believe is a “perfect” hybrid scenario.

We’ll be looking into setting up Autopilot, Intune for managing Windows 10 devices, securing them with Intune policies, breaching the gap between our on-premises infrastructure and Intune, by implementing CMG, Co-Management, …, configuring our on-premises ConfigMgr infrastructure and connecting that to the cloud as well. We’ll also touch on managing Android and iOS devices using Intune.

I have heard to ConfigMgr team talking about Autopilot to Co-Management scenario lately, and this is exactly what we will be doing here, just taking it one step at the time. This series can be consumed one blog at the time, or you can follow along. The nice thing about these technologies is that they can be implemented all at once, or as individual pieces, with each piece bringing in additional value, but of course, having them brings more value than just the sum of it’s pieces.

Kuhar LLC.

So let’s take a moment to see what our client currently has and where they want to be, what is the vision.

Current environment:

There is MEMCM (SCCM is dead, long live MEMCM) infrastructure in place. It is used to manage devices when connected to corporate network either directly when in the office, or when connected to VPN. As devices don’t roam, there is no need for internet management. They use M365 licenses to license devices and Office 365 for their employees.

Problems:

With work from home scenario being the norm now, all the devices are connecting using VPN to datacenter and network line is saturated with traffic that normally is not going over VPN, namely updates and software delivery.

Company is also seeing issues with devices that have stopped working and with devices needing replacement. They also have new employees joining the team and they need a way to provision these devices without physically being present in the office.

Vision:

Vision for Kuhar LLC. is to leverage cloud solutions as much as possible within limitations of their licenses. They do not want to incur additional costs, or at least keeping them down to a minimum as much as possible. They also do not want to re-work all of the processes from scratch, but keep as much of existing processes, as this will lower cost of educating personnel, as well as shorten time of adoption and improve IT ops buy-in.

Disclaimer:

The order in which this blog post series will move through technologies is not the way I would recommend you move. However this way, I believe it more clearly shows what each technology brings to the table and how different pieces of MEM are put together to make for a truly excellent product.

Blogpost series:

Deploy new Azure RM template

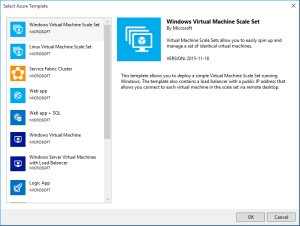
To create new Azure RM template you open up Visual Studio -> File -> New -> Project ->

Under Visual C# select Cloud and select Azure Resource Group.

Azure5

Select pre-built template

Azure6

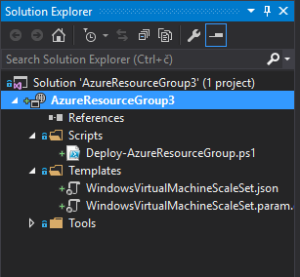
Now you have a script and .json file.

Azure7

Json file describes template and .ps1 script deploys it to resource group.
The problem is that cmdlets in .PS1 file are outdated.

http://blogs.msdn.com/b/powershell/archive/2015/07/20/introducing-azure-resource-manager-cmdlets-for-azure-powershell-dsc-extension.aspx
https://github.com/Azure/azure-powershell/wiki/Deprecation-of-Switch-AzureMode-in-Azure-PowerShell

So if you are like me and regularly update your modules, then you have to explore AzureRM module. Well. To be honest there is more than one.
https://www.powershellgallery.com/packages?q=azurerm

Install AzureRM.Storage cmdlets and change script:

Comment out any Switch-AzureMode
Replace last command with


Login-AzureRmAccount
New-AzureRmResourceGroup -Name $ResourceGroupName -Location $ResourceGroupLocation
New-AzureRmResourceGroupDeployment -ResourceGroupName $ResourceGroupName -TemplateFile $TemplateFile -TemplateParameterFile $TemplateParametersFile -Force -Verbose

Now basic deploy will work.

To deploy template to Azure

Right click soluiton in VS and select Deploy -> New Deployment
Enter your subscription details and other parameters, click Edit Parameters

Azure8 Azure9

That is it. just wait for it to deploy and you have a template deployed to Azure.

Have fun automating 😉


DSC Pull Server in Azure

I was working on a DSC pull server v2 for the last couple of months. I heard about all the great new bells and whistles it brings and I was eager to test them. I was also working on a web interface such as Mark Gray showcased on PowerShell Summit Europe 2015 in Stockholm. Here is the video for his session: https://www.youtube.com/watch?v=y3-_XBQTpS8&index=33&list=PLfeA8kIs7CodimM6hjMqE13xHTPQUB8Pf

So I was working on an interface for pull server to upload DSC configs, assign them to servers and to monitor the deployment. then a couple of days back, I saw this video up on Channel 9, where they were talking about Azure automation, https://channel9.msdn.com/Blogs/Regular-IT-Guy/Automate-everywhere-with-the-new-Azure-Automation-in-OMS–with-special-guest-Jeffrey-Snover. Really a great video, except for that guy that keep on interrupting. 🙂 Just kidding Jeffrey 😉

There I saw that Azure now has DSC pull server option that can also manage on-prem servers. I just had to try it out!

So let’s open our Azure portal, https://portal.azure.com/ and then click through

  1. New Automation Account
  2. Dsc Configurations
  3. Add a configuration
  4. Compile configuration

You have to create a new automation account, then click on DSC Configurations Upload a configuration file and compile it. I created a simple test config, that just installs XPS Viewer. (Sorry for lack of indentation…it keeps disappearing :/)

XPSTest - Microsoft Azure
configuration XPSTest
{
node test
{
WindowsFeature XPS
{
Ensure = 'Present'
Name = 'XPS-Viewer'
}
}
}

Azure1

Now that we have config uploaded and compiled we have to apply it to a node.

If you want to manage Azure VMs.

  1. Make sure you user Virtual machines with new “Resource mode”
  2. Click on Automation Accout you just created
  3. Click on DSC Nodes
  4. Add Azure VM
  5. Select virtual machines to onboard
  6. Click OK
  7. Configure registration data
  8. Click OK
  9. And click Create

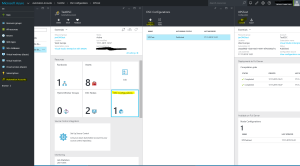
Azure3

There is one catch though. You can only manage “new” Azure VMs, created in Resource Mode, not “classic” VMs. Read here for explanation of differences: https://azure.microsoft.com/en-us/documentation/articles/resource-manager-deployment-model/.

Azure2

If you want to configure on prem machine you can select Add on-prem VM in step 4. you will find some instructions on how to do that, but cmdlets you have there are out of date!

http://blogs.msdn.com/b/powershell/archive/2015/07/20/introducing-azure-resource-manager-cmdlets-for-azure-powershell-dsc-extension.aspx

https://github.com/Azure/azure-powershell/wiki/Deprecation-of-Switch-AzureMode-in-Azure-PowerShell

Azure4

These instructions are out of date!

So if you are like me and regularly update your modules, then you have to explore AzureRM module. Well. To be honest there is more than one.

https://www.powershellgallery.com/packages?q=azurerm

For onboarding on-prem VM to Azure DSC pull server, you will need AzureRM.Automation.

Login-AzureRmAccount
Get-AzureRmAutomationDscOnboardingMetaconfig -ResourceGroupName 'RG name' -AutomationAccountName 'Automation Acc Name' -ComputerName 'Computer Name' -OutputFolder 'Folder for MOF files'

Apply mof to server

Set-DscLocalConfigurationManager -Path .\DscMetaConfigs\ -ComputerName DSCJBK2-T

Now you can see both types of machines in your Azure automation account. You can also change which configuration they should pick up, and see the history, basically all I was about to do on my own, I just found out can be done in Azure. 🙂

Happy automating 🙂


Deploying Operating systems with MDT, SCCM, Orchestrator and SCSM – part 7

I intend this to be a series of blog posts about my experience in implementing end to end OSD solution. I will be writing about my lab implementation, as production version has much unneeded clutter that would just confuse the whole blog post.

I thought this blog series would be split in following posts:

  1. Intro
  2. Lab setup
  3. MDT
  4. SCCM
  5. Intel AMT
  6. Orchestrator
  7. SCSM
  8. Bringing it all together
  9. Recap

OK, it is now time to deploy our self-service portal. I will be using SCSM for this, as it was the only thing available to me at the time. 🙂 In the mean time, that is since I started to write this blog post, I have come across other solutions that are better suited, at least in my opinion, if you just need the self-service portal. Using SCSM for just this functionality is, again in my opinion, moronic. 🙂 It is such a big product, that it makes no sense what so ever to use it for just this one bit. But if you have it in your datacenter already, then it might make more sense…

To present one possible alternative that, in my opinion, is better suited is ZervicePoint by Enfo Zipper: http://zervicepoint.com/

I had a chance to meet some of them in Stockholm and they are really great. I have also tested the solution in our datacenter and I have to say it is great! I cannot recommend it enough.

OK. With that out of the way 🙂 let’s dig into SCSM. I will not go in depth on how to install it, there are many guides online, like this one for minimum config: https://technet.microsoft.com/en-us/library/hh914211.aspx

But I would like to point out a few things I found out while deploying. For example, you cannot use special characters in SCSM service accounts passwords. You cannot use .$V^]@\u)D.x@on?”7IM for a password, which is a randomly generated string I wanted to use for a password for SCSM services account. It was too complex… 🙂

Another thing would be if you decide to install Self Service portal on a separate server and you want to use SCOM, make sure you install SCOM agent before you install SCSM, and leave it installed! This only applies to self service portal on a separate server. For all other roles you must uninstall SCOM agent, but for this role you must leave it installed. If you do not, then you do not have all SCOM bits you need and it does not work, and you cannot install SCOM agent, because installer detects that SCSM is installed and it will refuse to continue. There is a registry hack workaround, but I recommend planning ahead. 🙂

Link for self-service portal installation: http://www.server-log.com/blog/2011/12/29/scsm-2012how-to-install-the-self-service-portal.html


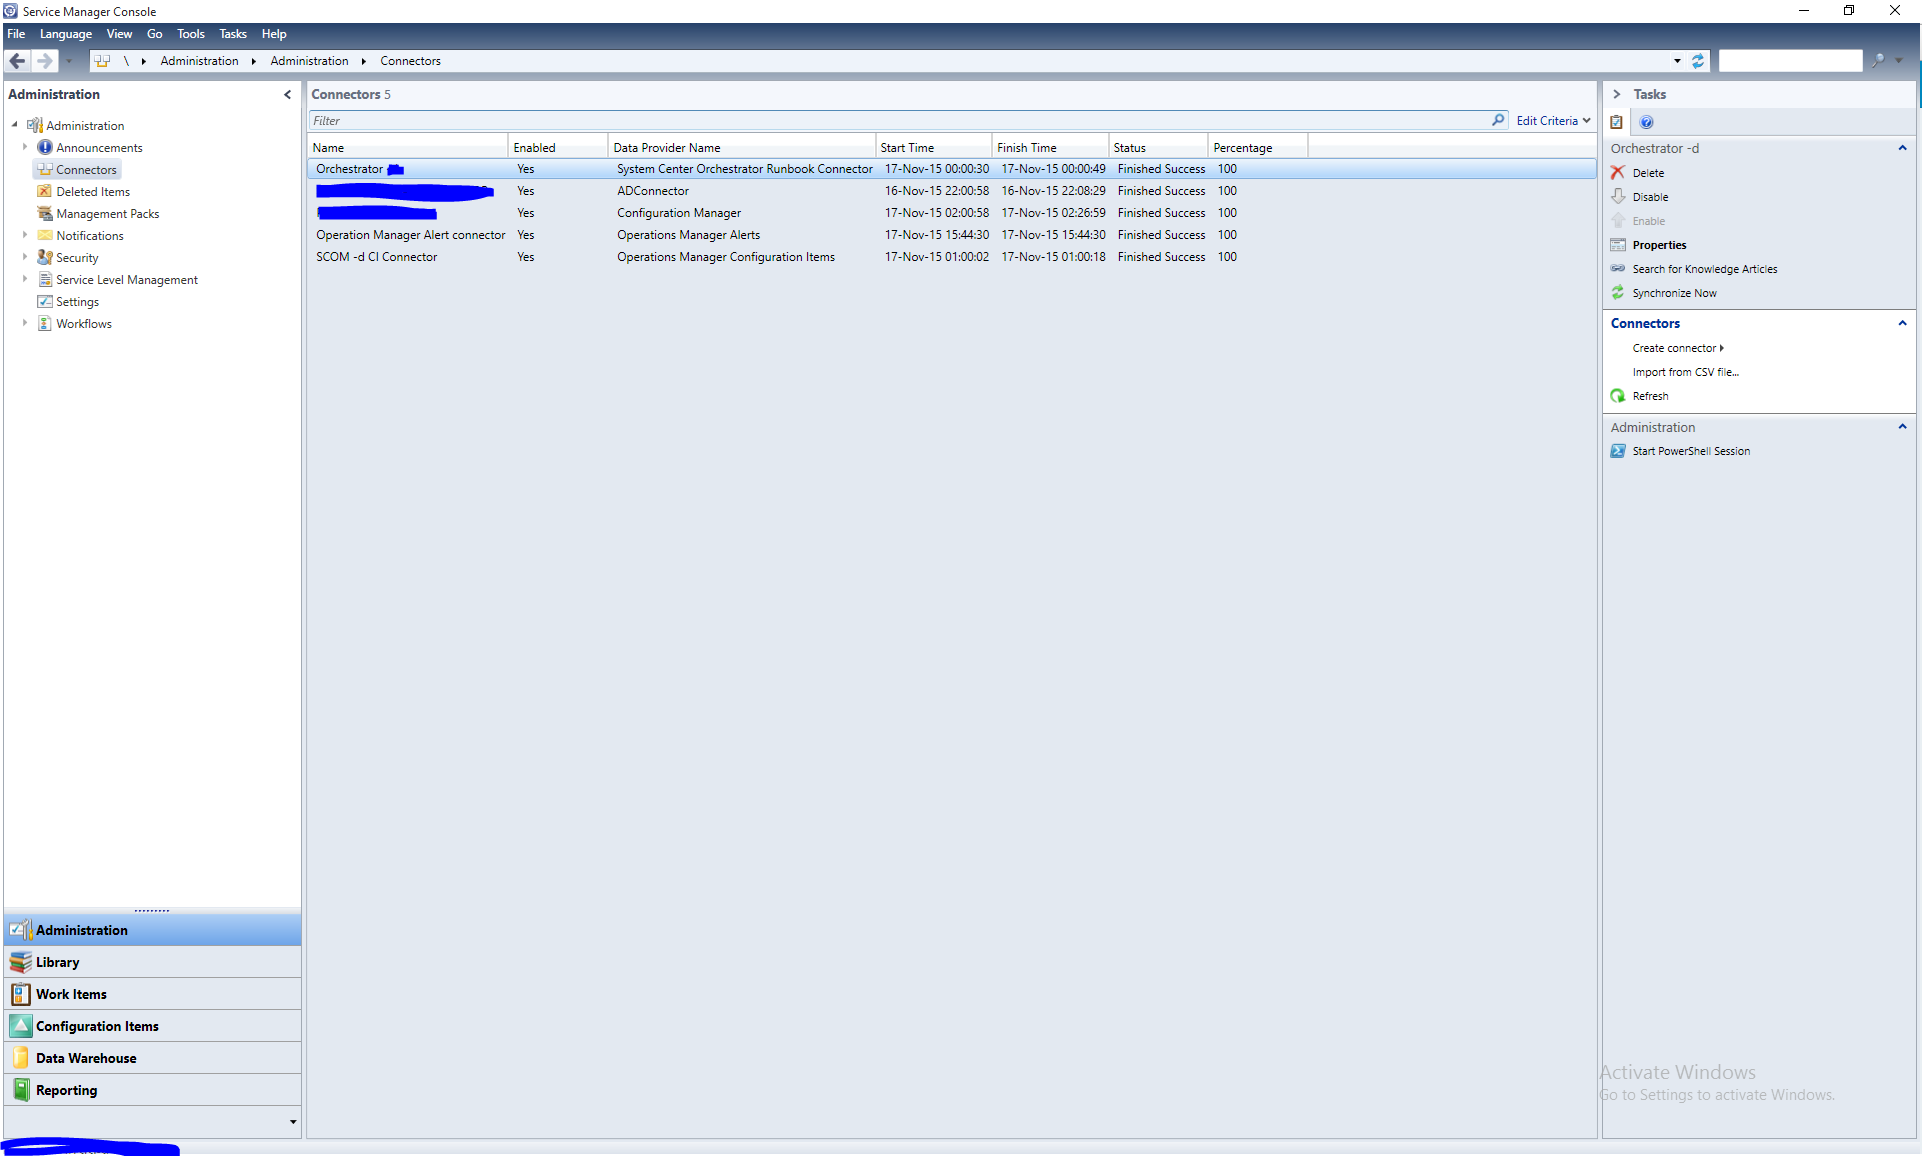
Now that we have SCSM and it’s self-service portal installed, we need to configure connectors so it can find computers, users, runbooks, … OK for what we will do, just runbooks will do. So let’s create an Orchestrator connector. In SCSM console:

  1. Go to Administration -> Connectors
  2. On right hand side click Create connector
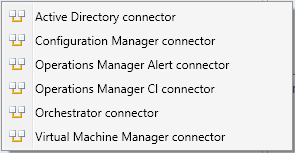
  3. Select Orchestrator connector
  4. Give it a name
  5. Write in the URL for Web service
  6. Create account that has permissions on Orchestrator server (It needs read and execute permissions on runbooks)
  7. Select sync folder (Which runbooks will be available to SCSM)
  8. Write in the URL for Web console

scsm1scsm2

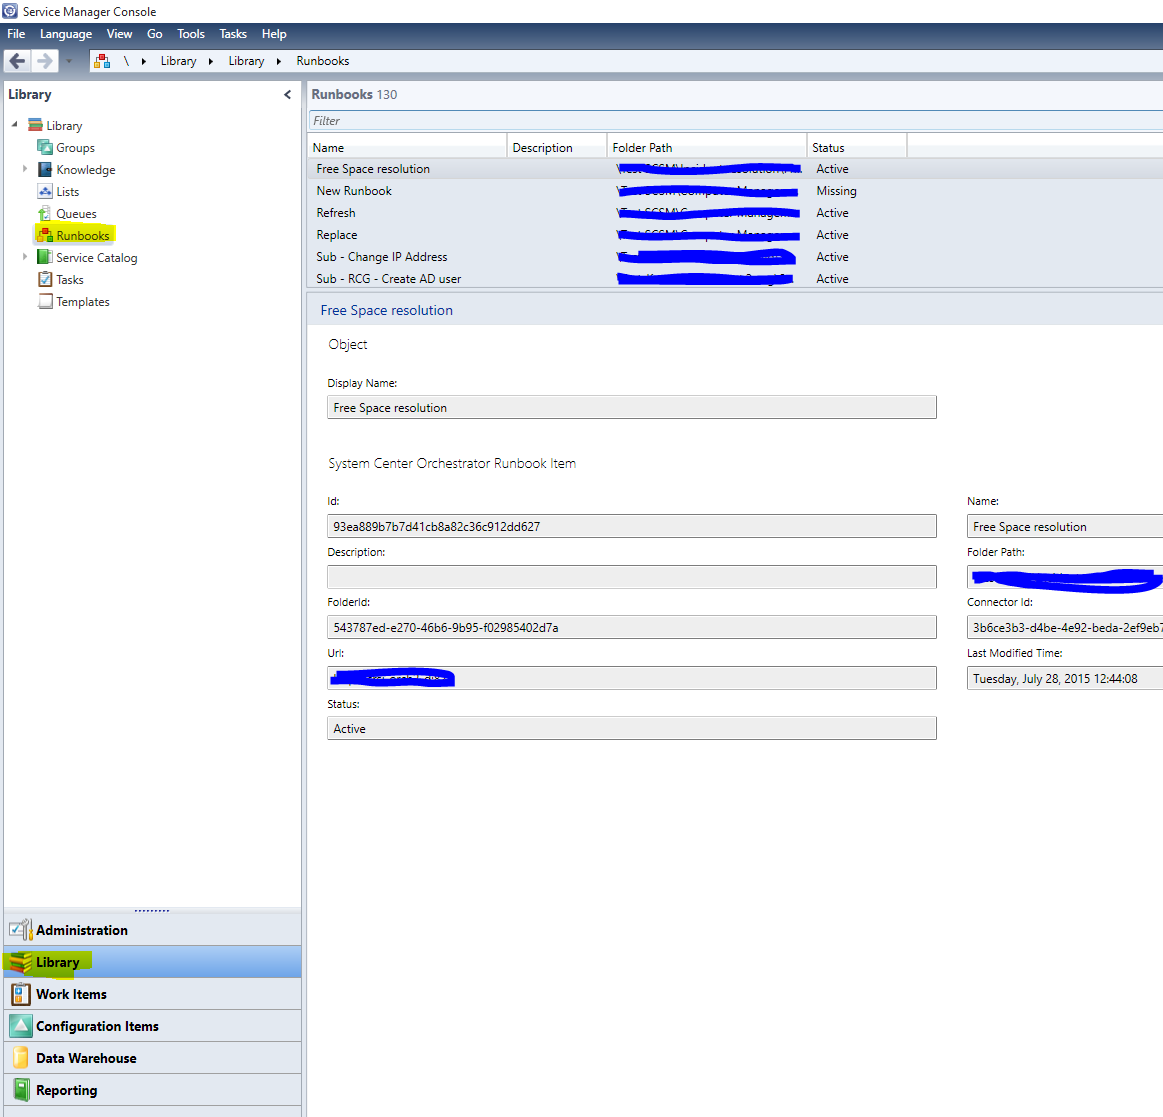
Now we have connector created, we need to wait for a while for it to sync the runbooks. After you see it complete you can check your notebooks in Library workspace -> Runbooks. I have noted that if you rename a runbook, it will not appear in SCSM as expected. In this case it is best to remove it from SCSM manually and sync Orchestrator connector again.

scsm3

Now that we have our runbooks available we need to name them available via self-service portal. now since SCSM is closely following MOF, which is following ITIL we have to get a few thins straight. 🙂 We will be creating a Service Offering in our Service Catalog in which we will make our Request Offering available.

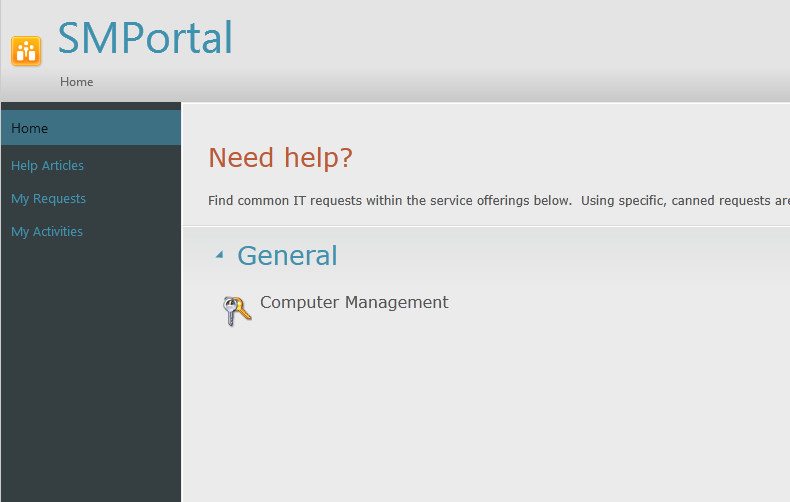
Let’s break this down. service catalog is a list of all available services. Each service can have a Request Offering, which is something we offer to our end users. In my environment I designed is as such. Our Service is Computer management, where users/admins/HD technicians can request application deploy, OSD, … This would be our Service Offering in SCSM and each of possible tasks users can do is a Request Offering.

You can find your service catalog just beneath your runbooks in Library workspace.

Let’s create there a new Service Offering. It is a straight forward process,  just make sure you select a custom Management Pack, as is the best practice for SCSM.

Now we will not create a Request offering just yet. First we need to create a few templates. Templates will enable us to create reusable working items. In Library workspace you can find Templates on the bottom of the list on the right side.

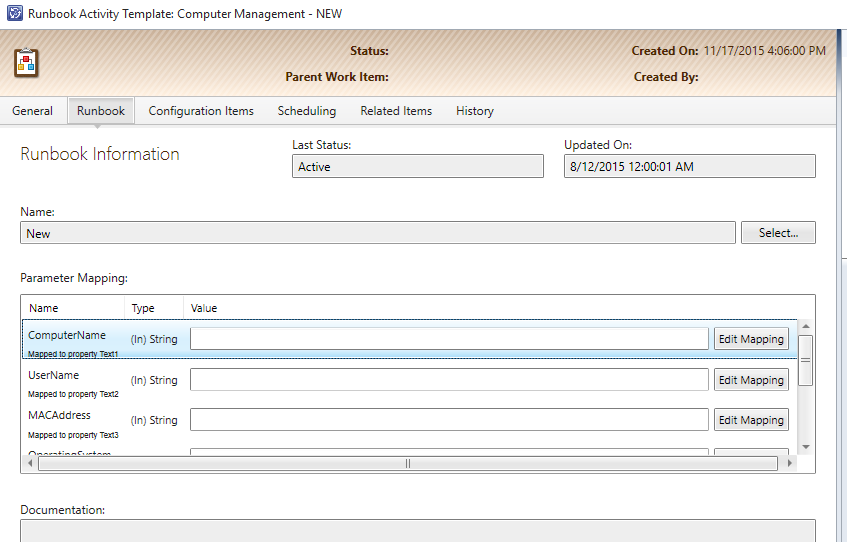
Create a new template and select Runbook Automation Activity. Please use sth like RAA in the name, so you can differentiate different kind of templates easily. I had to learn it the hard way 🙂 Also, use custom management pack you created earlier, or a completely new one. Click on Runbook tab and select the runbook for creating New Computer. Mappings should already be configured to text fields.scsm4

Now save and create another template. This time select Service Request template. Again, name it appropriately and select your management pack! 🙂 Click on activities tab and click on the little + in top right corner. Now select your Runbook Automation Activity you created in previous step.

scsm5.PNG

Now we are ready to create a Request Offering. Under Request Offerings click on Create Request Offering, give it a meaning full Title and select template. Select  Service Templates and select the one you just created. Select appropriate Management pack. Now you will have to create and configure appropriate User Prompts and map them. Now this is completely dependent on how you create your runbook in Orchestrator, mine look like this.

scsm6.PNG

Now that you have configured all this, you just need to publish it and assign it to a Service Offering you create in the first step. once this is is done, you can see it on your self-service portal.

scsm7scsm8

This is it for this blog series. It has been a looong time since I started. I hope some of you will find this useful. 🙂

Deploying Operating systems with MDT, SCCM, Orchestrator and SCSM – part 6

I intend this to be a series of blog posts about my experience in implementing end to end OSD solution. I will be writing about my lab implementation, as production version has much unneeded clutter that would just confuse the whole blog post.

I thought this blog series would be split in following posts:

  1. Intro
  2. Lab setup
  3. MDT
  4. SCCM
  5. Intel AMT
  6. Orchestrator
  7. SCSM
  8. Bringing it all together
  9. Recap

We are now able to deploy computers using MDT and SCCM, deploy specific operating system to a known computer in SCCM, and deploy New, Replace and Refresh scenarios. But all the work has to be done manually. At this point I started to look around for a solution that would enable me to automate all the steps needed to deploy computers, and that would also enable me to have a self service portal, so I would “never” have to lay my hands on this process.

One solution that I found at that time was to use System Center Orchestrator for automation part and System center Service Manager for the self service portal. This is what I built half a year ago and is a red line for this blog series. This is not a light weight solution, as it requires at least 3 servers just to do automation and self service portal, and if you only think of using it for OSD, there are probably better solutions for you, I will discuss them at the end. However, if you already have System Center license, then it comes at no additional license cost to you…

Anyway, let’s get into Orchestrator. First, you need to install it.

You will need to prepare the following:

  • Minimum of one server, I user 2012 R2
  • One service user, with which Orchestrator will run on server
  • Connector users Orchestrator will use to connect to external tools, with correct permissions.

When you have all this, you are ready to install Orchestrator.

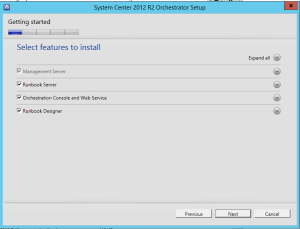
Insert your Orchestrator installation media and run Setup.exe and follow the wizard.

I installed all features on one server.

orch1

Then enter credentials for service account and test them. On the next screen enter database server name and instance. Make sure you have enough permissions on the database server. More info here: https://technet.microsoft.com/en-US/library/hh420367.aspx

On the next screen you can either user existing database or create a new one. Then select group which will administrative permissions on your Orchestrator installation.

Remember the ports you select on this next page, if you change them from default.

After you finish the installation, you are ready to user Orchestrator.


Now when I first started with automating OSD with Orchestrator, I thought about doing everything using runbooks and activities. After a while I figured out that not everything can be done with available activities, be it built in, or those from additional Integration Packs (OIP). I always ended up using PowerShell for one or another task, for example MDT. I also figured out that Orchestrator does not really like PowerShell. 🙂 I had to use Run .Net Script activity, or play around with PowerShell OIP.

So I set up writing my own OIP for missing features. And I slowly created MDT OIP, and a few other bells and whistles that were missing for this specific task I wanted to do. Then as a mental exercise I created PowerShell scripts that did the needed steps. I ended up running them with Run .Net Script. This was kind of OK, but then I have re-written and re-think the whole thing once again, and created one script that did all necessary steps in one go. In the end I created PowerShell Module for Computer Management which script being run from Orchestrator calls with parameters you enter.

It was quite a journey for me and I really learned a lot during this time. It is also one of the reasons it has taken almost 6 months to get to this point in blog series. I was always fine tuning the script, or module, or OIP to the point where I had a working solution in my development environment but I was adding new ways of achieving the same thing, that seemed better to me, at least at the time.. 🙂

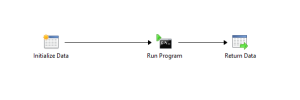
So this is how it ended up looking in a runbook.

orch2

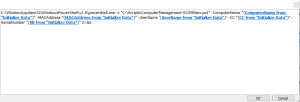
Really simple. I just get the data from Initialize Data, which I end up passing to Run command, like that:

orch3

Now I pass on quite a lot of information, because of the way I do permissions testing, Computer name structure, … We have quite a lot of rules there we have to adhere to. This also means I have a bit of a problem sharing all my scripts and modules with you… I will have to, you guessed it, re-write them all. 🙂 I will do it as soon as time permits and then release them in the wild, so you guys can use them as well. I will put the link to GIT here once I do that.


So, now we have Orchestrator installed, and hopefully I will be able to share the scripts I use with you soon, so then you have everything automated as well. Next step, creating a self service portal, where users, or HD guys, can request OSD for a computer.

Edit:

I have managed to create a quick sample code for Computer Management. It is a smaller version of what I actually created, I just omitted proprietary information and functions that check for permissions and computer name structure. The code is on GitHub, my first try with GitHub 🙂

https://github.com/djanny22/PowerShell/blob/master/JANComputerManagement.psm1

Deploying Operating systems with MDT, SCCM, Orchestrator and SCSM – part 4

I intend this to be a series of blog posts about my experience in implementing end to end OSD solution. I will be writing about my lab implementation, as production version has much unneeded clutter that would just confuse the whole blog post.

I thought this blog series would be split in following posts:

  1. Intro
  2. Lab setup
  3. MDT
  4. SCCM
  5. Intel AMT
  6. Orchestrator
  7. SCSM
  8. Bringing it all together
  9. Recap

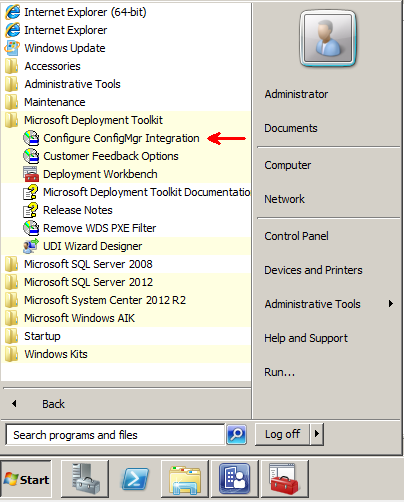
Now that we have MDT ready, we are prepared to configure SCCM. First we need to integrate MDT with SCCM. On your SCCM server, where MDT is also installed, click Configure ConfigMgr Integration in your All Programs -> Microsoft Deployment Toolkit.

Now we need to import boot image we created in MDT in SCCM, so we can leverage monitoring we created in previous chapter. In your SCCM console right click on Boot images and select Add Boot Image. Then navigate to your deployment share you created in MDT and select boot image from there. Now when you create task sequence use this image for your boot image.

Now you are ready to create MDT task sequences from SCCM. Open Task Sequences from your SCCM console -> Software Library -> Operating Systems node and select create MDT task sequence.


MDTTaskSequence

Task sequences are a veery large topic, so I will not go into depth what to do here. Johan Arwidmark has a lot of great posts on his deploymentresearch website. I created 3 different task sequences, one for New computer, one for Refesh and one for Replace scenario. For Replace there are actually 2 seperate task sequences, one for old computer, that gathers computer state and one for new computer, that installs OS and also copies data from old computer.

You also need 4 new collections, one for new, one for refresh and another two for replace scenarios. Replace needs 2 collections, one for “old” computers and another for new computer. Now you can deploy created task sequences to appropriate collections.

To create mappings for replace scenario, you need to configure Computer associations. This way SCCM knows how to manage user data from old computer to appropriate new computer. This will be done via script, because we do not know in advance all these mappings.

There are also a few site roles we need to provide to SCCM server(s) that are needed for all the bits and pieces to work. For migrating users data we need State Migration Point, for OSD we also need Distribution Point enabled. I’ll assume you already have DP enabled in your hierarchy, so here are just a few tips on installing SMP.

  • Make sure you have SMP installed on your DPs. If you add it to another server, that is not a DP, it will cause you problems. You have to connect your SMP to a boundary group and when you do that SCCM automatically assumes your SMP is also DP and your distributions will fail…
  • Also, if you use HTTPS for your DP communications, and you should, you probably have certificate issued by your PKI. When you install SMP suddenly your PKI cert is no longer selected and SCCM reverts to self-signed certificate and you have to manually re-import your PKI cert. When you do that, SCCM says cert is already in use, but that is OK. I figure this is an undocumented feature when you add SMP to your existing infrastructure…
  • You have to re-enable your PXE point after you install SMP, as it gets disabled.

SMP-DP SMP-PXE

OK…This should do for now. We have installed Site Components we need on SCCM, integrated it with MDT, created Task Sequences and Collections and target deployments. We have also found a few new undocumented features and now we are ready to automate the deployment.

If you do not want to automate deployment, right now is where things stand. We have collections to which we add computers. When computer is added a relevant task sequence is deployed. If we want to deploy Replace scenario then we add old computer to one Collection and new computer to another. We also have to create Computer Association for them. We can now play with deployments. 😉

Another nifty feature with deploying OSD in such a way is that you can download WinPE image from Windows using BITS instead of using network boot and PXE. This comes to great use when deploying over WAN as PXE is limited by RTT and not bandwidth. We have had deployments over WAN where WinPE was being downloaded for over 3 hours! So this is a great time saver for some of our deployments.

So. next time we will dive into automation. I will skip AMT for now and come back to it later…maybe, since Microsoft announced deprecation for OOBM in SCCM https://technet.microsoft.com/en-us/mt210917.aspx.

Deploying Operating systems with MDT, SCCM, Orchestrator and SCSM – part 3

I intend this to be a series of blog posts about my experience in implementing end to end OSD solution. I will be writing about my lab implementation, as production version has much unneeded clutter that would just confuse the whole blog post.

I thought this blog series would be split in following posts:

  1. Intro
  2. Lab setup
  3. MDT
  4. SCCM
  5. Intel AMT
  6. Orchestrator
  7. SCSM
  8. Bringing it all together
  9. Recap

I finally got around to writing the next part of this blog series. It has been long overdue, but circumstances did not allow me to get to it. I plan on doing it now in a swift fashion.

I have managed to finish this setup in my dev environment, but for some reason, I cannot put it into production, even though it is all ready to deploy, god understand managers if he can… Now with my chest cleared, let’s get cracking 🙂

Microsoft Deployment Toolkit, MDT, is a free collection of scripts that allow for Lite Touch Installation (LTI) deployment of Windows. It actually supports ZTI, LTI and UDI, but it is regarded as a LTI solution. Only when connected to SCCM it becomes true ZTI. There is a great explanation of this in a book written by Johan Arwidmark, Stealing with Pride. It is a great resource on MDT and deployment.

So we are going to leverage MDT for its database, monitoring, logging and we will create MDT task sequences in SCCM. We will also import DaRT in MDT and boot image, so we can connect to deploying computer and actually see the screen while Windows is deploying.

Installing MDT is straight forward, as well as using deployment database. There are many great guides on internet, but for starters basic next, next, finish should be enough, even though I prefer PowerShell scripted solutions 🙂 Once it is installed, you need to create a new deployment share and new database, it is just a matter of right clicking deplyoment share and database node and you should be on your way.

Since we will leverage SCCM for deployment we do not need to create a task sequence in MDT, or install images, but we do want to create a boot image, so we can manage monitoring later on.

To enable monitoring you have to go to deployment share and under monitoring tab enable monitoring. be aware though that monitoring has it own logging as well. By default it is set to information level, and default path is C:\temp !! So if you have this folder on your C: drive, it will start saving logs to your temp folder and it will fill your disk and break your computer 🙂 So to prevent this from happening, we want to change log level and change log file location. Johan has a great post about it here.

image

So now we have monitoring and log files for it are under control. We just need to enable DaRT in our boot images, so we can actually connect to computer and see what is going on on the screen. First you need to get DaRT, it is part of MDOP. After you download DaRT you have to install it. Then

  1. Copy the Tools.cab file from the DaRT installation to the appropriate tools folder (either Tool\x86 or Tools\x64) in a deployment share.
  2. In the Deployment Workbench console tree, go to Deployment Workbench/Deployment Shares
  3. In the details pane, click deployment_share (where deployment_share is the name of the deployment share for which you want to enable DaRT support).
  4. In the Actions pane, click Properties.
    The deployment_share Properties dialog box appears (where deployment_share is the name of the deployment share for which you want to enable DaRT support).
  5. In the deployment_share Properties dialog box, on the Windows PE tab, select platform (where deployment_share is the name of the deployment share for which you want to enable DaRT support and platform is the processor architecture platform for which you want to enable DaRT support), select the Microsoft Diagnostics and Recovery Toolkit (DaRT) check box, and then click OK.
  6. Update the deployment share.

That is it. now you have a WinPE, boot image, with DaRT integrated. you can also see an extra button if you click on a computer under Monitoring node in MDT Workbench.

image

Here are some resources I found while exploring MDT and DaRT. Hope you find them helpful.

Deploy DaRT with the Microsoft Deployment Toolkit:

https://technet.microsoft.com/en-us/windows/hh475799.aspx?f=255&MSPPError=-2147217396

Integrating DaRT (8.x) with MDT (2013) and enable DaRT Remote Control:

http://www.vkernel.ro/blog/integrating-dart-8-x-with-mdt-2013-and-enable-dart-remote-control

Adding DaRT 8.1 from MDOP 2013 R2 to ConfigMgr 2012 R2:

http://deploymentresearch.com/Research/Post/334/Adding-DaRT-8-1-from-MDOP-2013-R2-to-ConfigMgr-2012-R2

Deploying Operating systems with MDT, SCCM, Orchestrator and SCSM – part 2

I intend this to be a series of blog posts about my experience in implementing end to end OSD solution. I will be writing about my lab implementation, as production version has much unneeded clutter that would just confuse the whole blog post.

I thought this blog series would be split in following posts:

  1. Intro
  2. Lab setup
  3. MDT
  4. SCCM
  5. Intel AMT
  6. Orchestrator
  7. SCSM
  8. Bringing it all together
  9. Recap

OK. So in previous post we covered what and why we want to do. Now it is time for the where. Let me describe what my lab looks like, so you can understand better later on as I will be saying things like connect to SCO or open SCSM Self Service Portal.

Basically we will be using four Microsoft products that are also part of the title. Three from System Center 2012 R2 suite and free toolkit. These are:

  • System Center Configuration Manger 2012 R2, or SCCM
  • System Center Service Manager 2012 R2, or SCSM
  • System Center Orchestrator 2012 R2, or SCO, or SCOrch
  • Microsoft Deployment Toolkit 2013, or MDT

I will also name a few other products as we go along that add some bells and whistles, like Intel AMT, and DaRT.

The LAB

I am not going to count ADDS and ADCS and DNS and DHCP and … as part of our LAB as this is way beyond this scope.

This way lab contains four servers. Primary SCCM site (CMPS1), SCCM Distribution point (CMDP1), SCO server (SCO1) and SCSM server (SCSM1).

All the servers are running Windows Server 2012 R2 and are virtualized with Hyper-V. For client computers I am using either physical Lenovo computers or I just spin up some virtual computers on my notebook.

CMPS1 has installed many roles, but for this lab we are going to need Enrollment point, Management point, Out of band service point and State migration point

CMDP1 has installed Distribution point and MDT.

SCO1 has all components needed for Orchestrator installed.

SCSM1 has all components for SCSM installed. We do not leverage SCSM Data Warehouse in this example.

Installing all of the different server components is really not in the scope of this post, so here are some helpful links. I will point out what to look out for when installing different components as we go along. For now, just links. Thank you Kevin!

SCCM

http://blogs.technet.com/b/kevinholman/archive/2013/10/30/configmgr-2012-r2-quickstart-deployment-guide.aspx

http://prajwaldesai.com/sccm-2012-r2-step-by-step-guide/


SCSM

http://blogs.technet.com/b/kevinholman/archive/2013/10/18/service-manager-2012-r2-quickstart-deployment-guide.aspx


SCO

http://blogs.technet.com/b/kevinholman/archive/2013/10/18/orchestrator-2012-r2-quickstart-deployment-guide.aspx


MDT

http://jasonmlee.com/archives/178

This is it for the lab. Now we need to do something with it. This is now what, why and where. Just the how remains…

  1. Intro
  2. Lab setup
  3. MDT
  4. SCCM
  5. Intel AMT
  6. Orchestrator
  7. SCSM
  8. Bringing it all together
  9. Recap

Deploying Operating systems with MDT, SCCM, Orchestrator and SCSM – part 1

I intend this to be a series of blog posts about my experience in implementing end to end OSD solution. I will be writing about my lab implementation, as production version has much unneeded clutter that would just confuse the whole blog post.

I thought this blog series would be split in following posts:

  1. Intro
  2. Lab setup
  3. MDT
  4. SCCM
  5. Intel AMT
  6. Orchestrator
  7. SCSM
  8. Bringing it all together
  9. Recap

This is a rough outline that I in vision at the beginning of writing, so it will probably change. I will link the following posts back to these bullet points for easier following.

So without further ado, let get stuck in. First, let’s try to sum up what we will be doing and why.

INTRO:

There are a few goals I would like to achieve with OSD deployment process, I will explain reasoning for them below:

  • Monitor deployment from end-to-end from help desk technicians workstation
  • Deploy OS to known rather than unknown computers
  • Support computer Replace and Refresh scenarios besides bare metal deployment
  • In Replace and Refresh scenarios ensure user data is preserved
  • Enable self service portal for requesting OSD
  • In refresh scenarios do not use PXE boot

Monitoring OSD is achieved in 3 steps. One is enabling monitoring in MDT. This gives us the ability to check on progress of all deployments. Second is enabling DaRT in conjunction with MDT monitoring. This gives the ability to “remote” into WinPE and see remote screen from out workstation. This is very useful for when errors occur and we need to troubleshoot. The third option we will enable is Intel AMT. With this we get the ability to connect to computer event when it is turned off. We can adjust BIOS settings, force it to use specific device for boot at next start-up and most importantly, from monitoring perspective, we get the ability to connect to it using VNC. Now we can see and interact with remote computer all the way from start to finish.

More about monitoring in the following posts. We will also answer questions like, why DaRT and Intel AMT, and not just the latter?

Why deploying OS to “known” rather than unknown computers? When deploying OS with SCCM you have two basic options, you can deploy your task sequence to Unknown computers, or you can deploy to other collections. If you deploy to unknown computers you can just start any new computer, PXE boot it and windows will install, sort of 🙂 BUT, what will the name be? MININT-****** does not suit you? OK then. MDT to the rescue! You can add computers to MDT DB and give it a name. OK. Good. Computer is still Unknown from SCCMs point of view, so it will deploy OS to it, but the computer is “known” from MDTs view, so it will get correct name and all other settings that you put in there.

So, what is the downside to this kind of deploying? Well say you want to Replace a computer. You would have to make a computer association in SCCM, which cannot be done until new computer is finished deploying. And since we are already importing computers to MDT prior to actually deploying them, why not create them in SCCM as well?

Another upside for this would be that you completely control who can deploy computers. No more need for protecting PXE sites with passwords and enabling F12 for extra protection. If computer is not assigned for a deployment, it will not have anything to deploy.

Support computer Replace and Refresh scenarios besides bare metal deployment is described in previous paragraph. This requirement is directly linked and dependent on deploying to known computers.

In Replace and Refresh scenarios ensure user data is preserved requirement leverages USMT at its core. Basically what it does it copies users data from old computer to a new one, or in case of Refresh, it makes sure it is copied back to computer. But since we are also using SCCM, it ensures that all programs are installed on new computer.

Enable self service portal for requesting OSD.  With SCSM self service protal, we can enable users to request Refresh scenarios for their own computers, or if you find this too risky:) help desk technicians can do this for any user and never leave their desk. This way we do not to distribute any scripts, help desk does not have to ask administrators every time a computer needs to be deployed to put it in MDT, … just point them to SCSM Self Service portal, where they fill out a form and wait.

In refresh scenarios do not use PXE boot was not requirement in the beginning, but once I found it, it was a must. I will go in depth why we need this so badly. I’ll give you a hint, it has to do with TFTP. 🙂

OK. I think we covered all the objectives, and why they matter, now lets go to our LAB environment.

  1. Intro
  2. Lab setup
  3. MDT
  4. SCCM
  5. Intel AMT
  6. Orchestrator
  7. SCSM
  8. Bringing it all together
  9. Recap

This is a rough outline that I in vision at the beginning of writing, so it will probably change. I will link the following posts back to these bullet points for easier following.